Migrate your Virtual Machines to OpenShift Virtualization
Introduction
Utilize the Migration Toolkit for Virtualization (MTV) Operator to migrate virtual machines from virtualization providers to OpenShift Virtualization.
But first, What is OpenShift Virtualization?
OpenShift Virtualization (Kubevirt) lets developers and administrators bring VMs, as they are, into Kubernetes and the containerized world. Once there, they can run multi-tier workloads in a single, declarative environment. This allows developers to focus on the containerized parts of the workload first, without slowing the modernization process while trying to figure out what to do with applications that are still running in VMs. With OpenShift Virtualization, containers and VMs can be managed using the same cloud-native tools and processes.
OpenShift Virtualization allows organizations to work with a single modern platform simplifying their management and reducing costs. For more information, click here.

So, let's start
Prerequisites
- OpenShift cluster
- Installed Operators: NMState, OpenShift Virtualization, MTV
- Storage CSI
- BM nodes and NICs
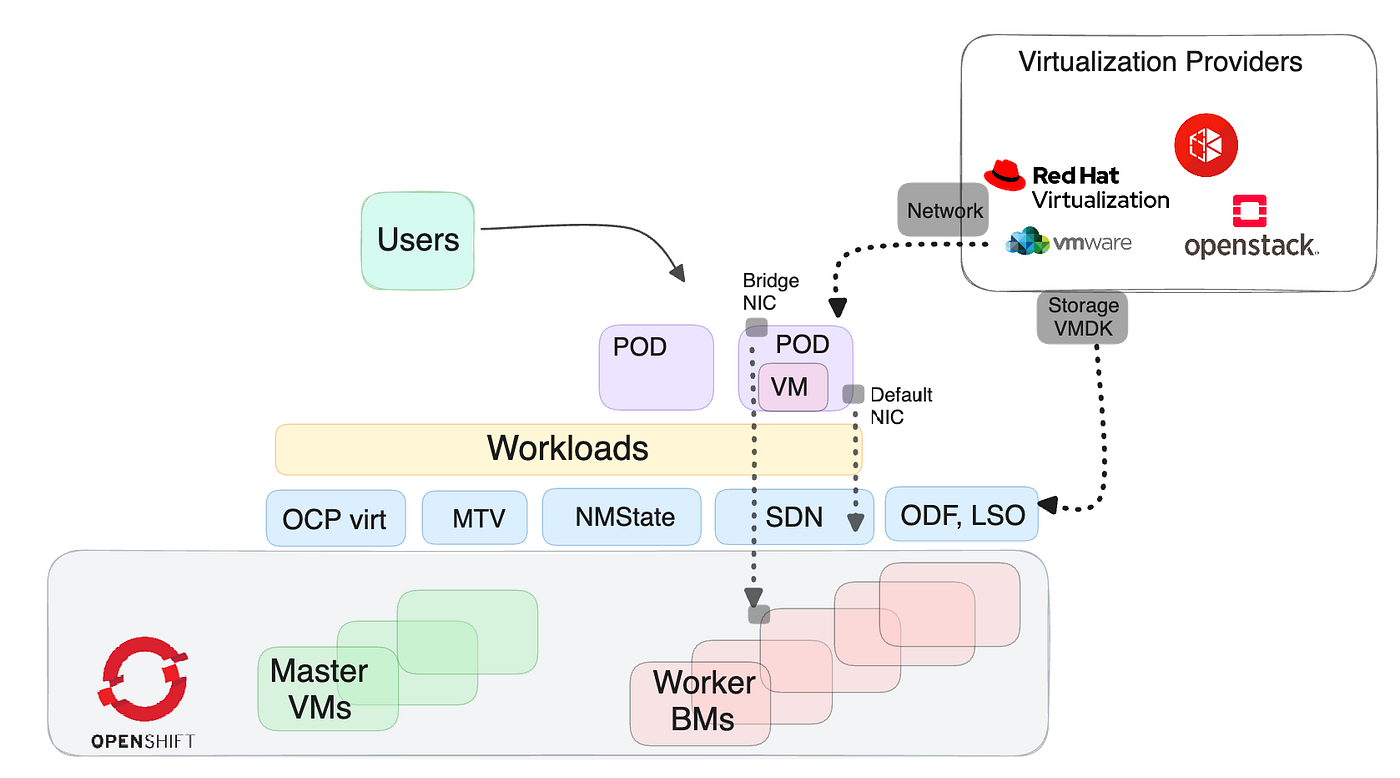
Network — NMState and Multus
When migrating a system, especially initially, we aim to minimize changes. To ensure minimal disruption for our customers, our priority is to enable network migration first.
By default, VMs are connected to the default pod network. The VMs communicate with resources within the cluster, or with any resources that are accessible through the OpenShift node network. If a VM requires access to resources on a different network, then you must connect the VM to that additional network (==enable network migration).
OpenShift Virtualization uses Multus Container Network Interface (CNI) and the Kubernetes NMState Operator resources to create a Linux bridge that connects VMs to additional networks.
Multus CNI
Container network interface (CNI) plugin for Kubernetes that allows multiple network interfaces to be attached to pods.

NMState Operator
Configure additional interfaces using NMState Operator, the Operator provides users with functionality to configure various network interface types, DNS, and routing on cluster nodes.
- The following example shows an NodeNetworkConfigurationPolicy (NNCP) that defines a Linux bridge on a node’s enp3s0 network interface.
apiVersion: nmstate.io/v1
kind: NodeNetworkConfigurationPolicy
metadata:
  name: br-flat
spec:
  desiredState:
    interfaces:
    - bridge:
        options:
          stp:
            enabled: false
        port:
        - name: enp3s0
      description: Linux bridge with enp3s0 as a port
      ipv4:
        dhcp: false
        enabled: false
      name: br-flat
      state: up
      type: linux-bridge
  nodeSelector:
    node-role.kubernetes.io/worker: ""
2. Add a Linux Bridge to Virtual Machines. Once a Linux bridge is configured on nodes, create a network attachment definition (NAD)
NOTE: NADs that you create in the
defaultnamespace are available to all VMs in the cluster.
apiVersion: k8s.cni.cncf.io/v1
kind: NetworkAttachmentDefinition
metadata:
  annotations:
    k8s.v1.cni.cncf.io/resourceName: bridge.network.kubevirt.io/br-flat
  name: aelfassy-mtv-demo-nad
  namespace: default
spec:
  config: >-
    {"name":"aelfassy-mtv-demo-nad","type":"cnv-bridge","cniVersion":"0.3.1","bridge":"br-flat","macspoofchk":true,"vlan":x,"ipam":{}}
Linux Bridge can have many different VLANs. (Trunk)
For more information, click here
Storage
For the storage migration, it’s important to consider the specific requirements of the application (VM). This includes the type of storage needed (Object, Block, File), as well as the access modes (RWO or RWX).
In my demo, I utilize OpenShift Data Foundation (ODF) Container Storage Interface (CSI), which provides me with all the necessary options.

Migration Toolkit for Virtualization (MTV)
The Migration Toolkit for Virtualization (MTV) enables you to migrate virtual machines from virtualization providers to OpenShift Virtualization running on the OpenShift Container Platform.
Prerequisites:
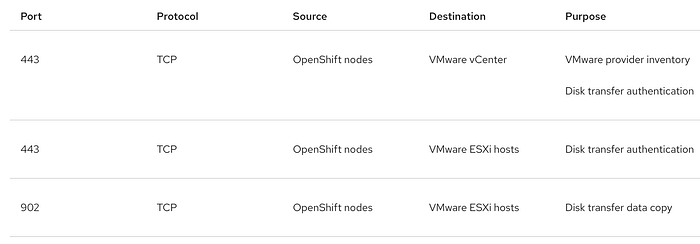
For more info click here.
Main Features:
- Migration of VMs from VMware vSphere, RHV, OpenStack, and Remote OpenShift Virtualization clusters to OpenShift Virtualization
- Easy-to-use UI
- Migration Network
- Data pre-copied (Warm Migration)
- VM validation service
- Providers for Virtualization

NOTE: In my demo, I utilize VMware provider for migration

Creating and using a VDDK image
MTV uses the VMware Virtual Disk Development Kit (VDDK) SDK to transfer virtual disks from VMware vSphere.
You can download the VDDK, build a VDDK image, and push the VDDK image to your image registry.
For more info click here.
Creating and using a SHA-1 fingerprint
vCenter:
root@VCSA67PR [ ~ ]# echo | openssl s_client -connect localhost:443 2>/dev/null | openssl x509 -noout -fingerprint -sha1
SHA1 Fingerprint=A2:FE:0C:92:73:9E:0F:B9:7B:81:EF:B6:0B:31:75:96:74:23:FB:AC
For more info click here.
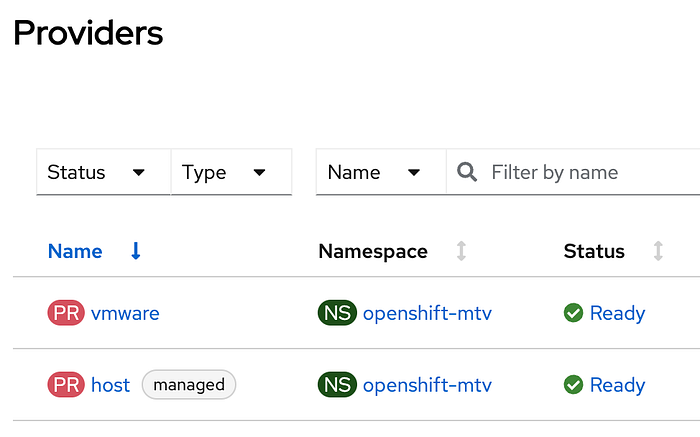
NOTE: The
hostcreated automatically for the destination (our OpenShift cluster)
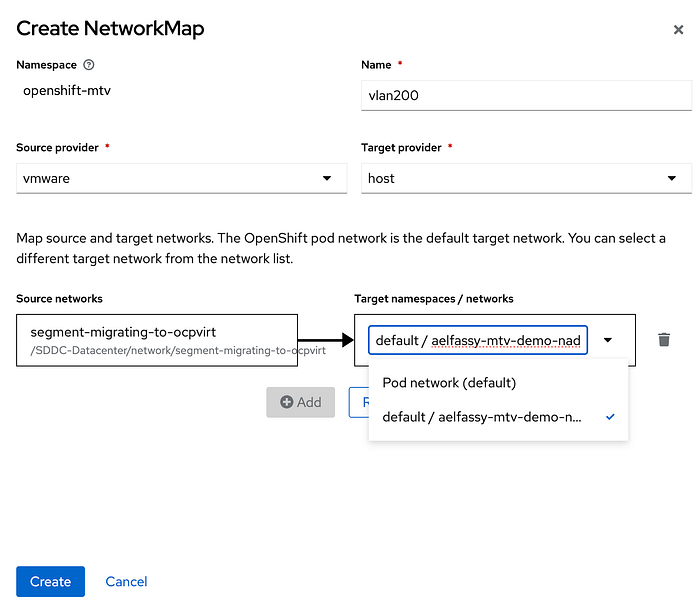
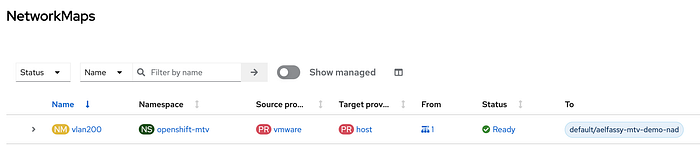
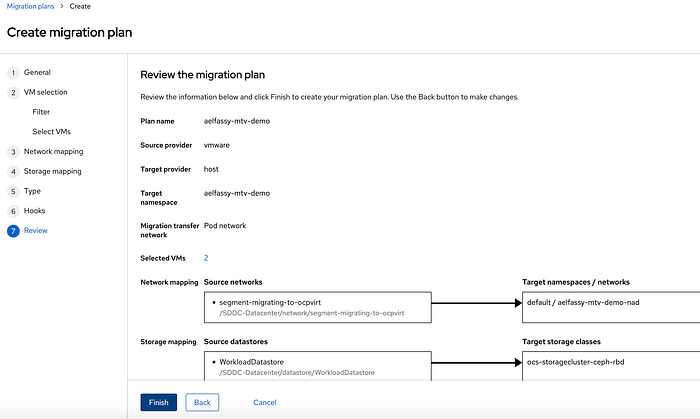
2. Create a NetworkMap
I recommend selecting the Name by the VlanID that migrates from the legacy environment. Please note that I’ve chosen the NAD (network attachment definition) I created in advance to facilitate the network migrates, ensuring the usage of the same Vlan and preserving the original IP address of the VM from the legacy virtualization provider.
If the original IP address of the VM is necessary, we should avoid using the OCP cluster SDN (Software-Defined Network) network, as it likely operates on a different Vlan.
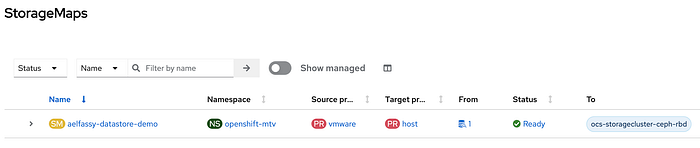
3. Create a StorageMap
I recommend selecting the Name by the datastore that migrates from the legacy environment. Please note that I’ve chosen the StorageClass I created in advance to facilitate the storage migrates, and the usage of the specific requirements needs of the application (VM).

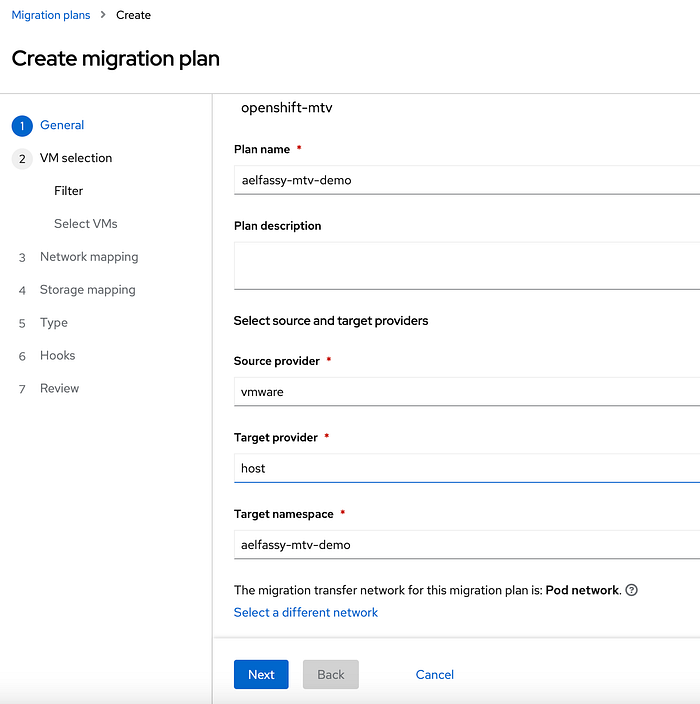
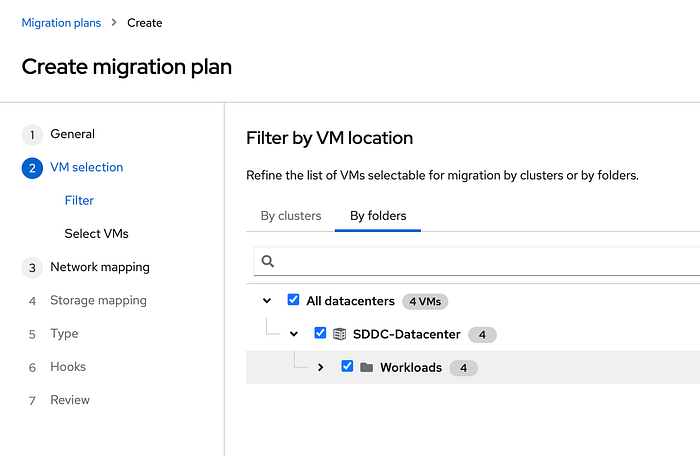
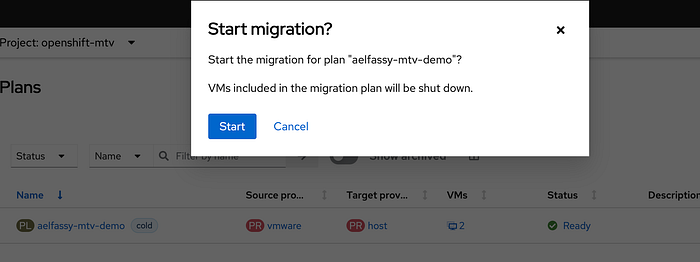
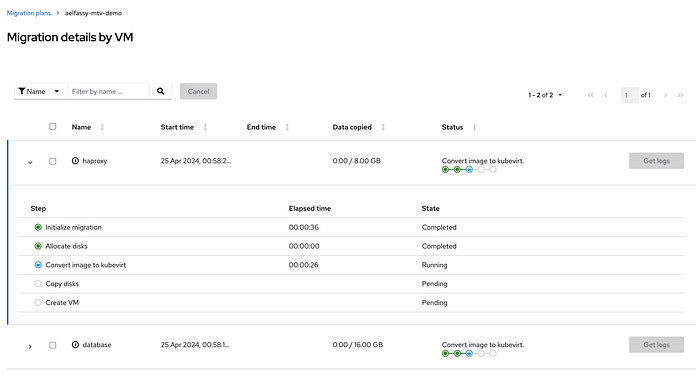
4. Create a plan for virtualization
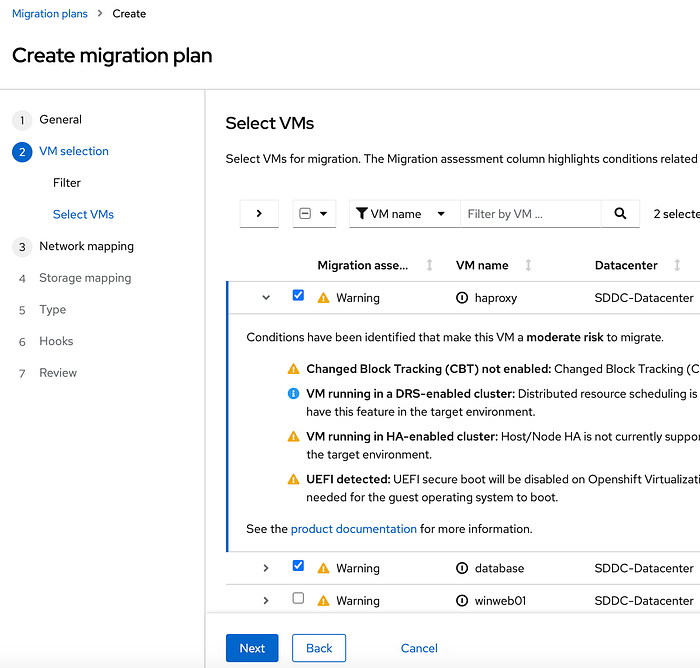


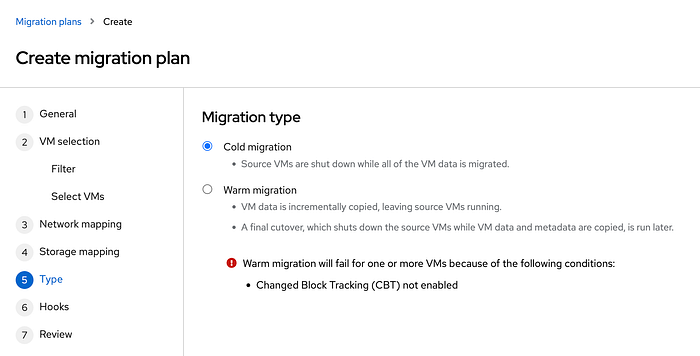
NOTE: Precopy stage
The VMs are not shut down during the precopy stage.
Changed Block Tracking (CBT) must be enabled for each source VM and each VM disk.
ctkEnabled=true
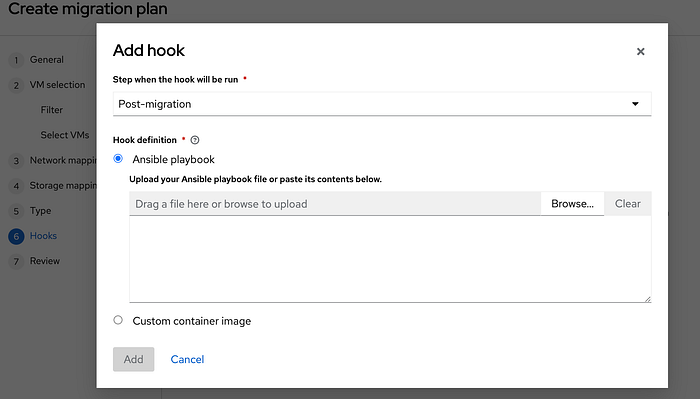
Option to create an Ansible playbook for example route or label create

Now you can use your brand new virtualization provider and rule the world!